What it is
Every finding opens in a panel that tells you where the problem is, why it matters and how to fix it, with a ready-made prompt for your AI coding assistant.
Who gets it
Cloud and Cloud Plus. On Free, the panel shows "Finding details, fix prompts and AI fixes are part of SafeWeave Cloud." with a link to start a trial. Scans from your editor show full details on every plan; see Add SafeWeave to your editor.
How to use it
Open a finding
Click a row on Findings, Details → on a repository page, a row on a scan page, or View in SafeWeave on a GitHub check. The panel opens on the right. Close it with ×, the Esc key, or by clicking outside it.
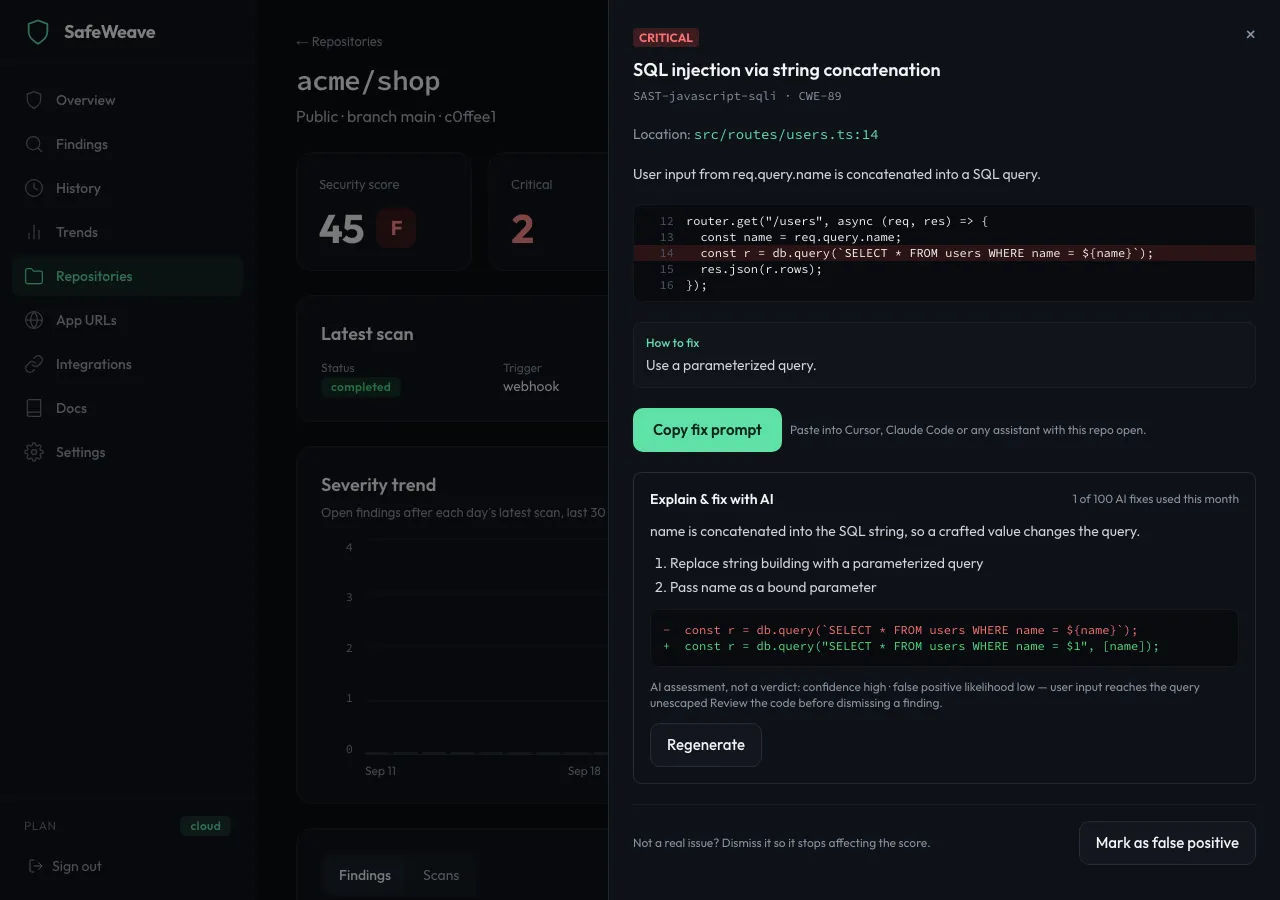
The panel shows:
- the severity, title, rule and CWE
- Location: the file and line, linked to GitHub
- what the problem is, and the code around it
- How to fix
Copy a fix prompt
- Click Copy fix prompt. It changes to Prompt copied.
- Paste it into Cursor, Claude Code or any AI assistant with your repository open.
- Review the change it makes, commit and push. The next scan marks the finding resolved.
Explain & fix with AI
- In the panel, click Explain & fix with AI. It shows Thinking….
- You get an explanation in plain words, numbered steps and a code change.
- Under the answer, SafeWeave shows how confident the AI is and how likely the finding is a false positive, with its reason.
- Click Regenerate for a fresh answer.
The panel shows how many AI fixes you've used this month ("N of M AI fixes used this month"). Cloud Plus's allowance is larger than Cloud's. AI answers can be wrong: review the code before applying a change or dismissing a finding.
Dismiss a false positive
If a finding isn't a real problem:
- Click Mark as false positive.
- It's excluded from your score and from GitHub checks. The panel says "Dismissed — excluded from the score and from GitHub checks."
To undo, open it from the False positives tab on the repository page and click Restore finding.
What you'll see
After you push a fix, the next scan moves the finding to Resolved and your score goes up.
Limits
- AI fixes have a monthly allowance. Failed requests don't count.
- The fix prompt and AI fix cover the code around the finding; larger changes may need more context in your assistant.
If something goes wrong
- "Could not load this finding.": close the panel and open it again.
- "The AI request failed." or another message under the AI button: try again in a minute. If you've used your monthly allowance, the panel says so.
- The finding comes back after you fixed it: check that the fix was pushed to the branch SafeWeave scans (your default branch), then click Scan now.