This page walks you from an empty account to your first grade and your first fix. Each step says where you are, what to click, what to fill in, what you should see next and what to do if it doesn't work.
Your path
| Plan | What you do first | Time |
|---|---|---|
| Free | Create your account, connect GitHub, add your one repository, read your grade, scan your live app, add SafeWeave to your editor | about 10 minutes |
| Cloud | Everything on Free, then open a finding, fix it with AI, and turn on monitoring for your app | about 15 minutes |
| Cloud Plus | Everything on Cloud, then invite your teammates | a few more minutes |
You can start on Free and upgrade at any time. Your repositories, scans and settings carry over when you upgrade. You get a new license key by email, so update it wherever you use SafeWeave.
Create your account
- Go to safeweave.dev and click Create free account in the top bar.
- You are on the Get Started with SafeWeave page. Choose one way to sign up:
- Click Sign up with GitHub and approve the request on GitHub, or
- Click Sign up with Google and pick your Google account, or
- Fill in Email Address and Password (at least 8 characters), then click Create Account.
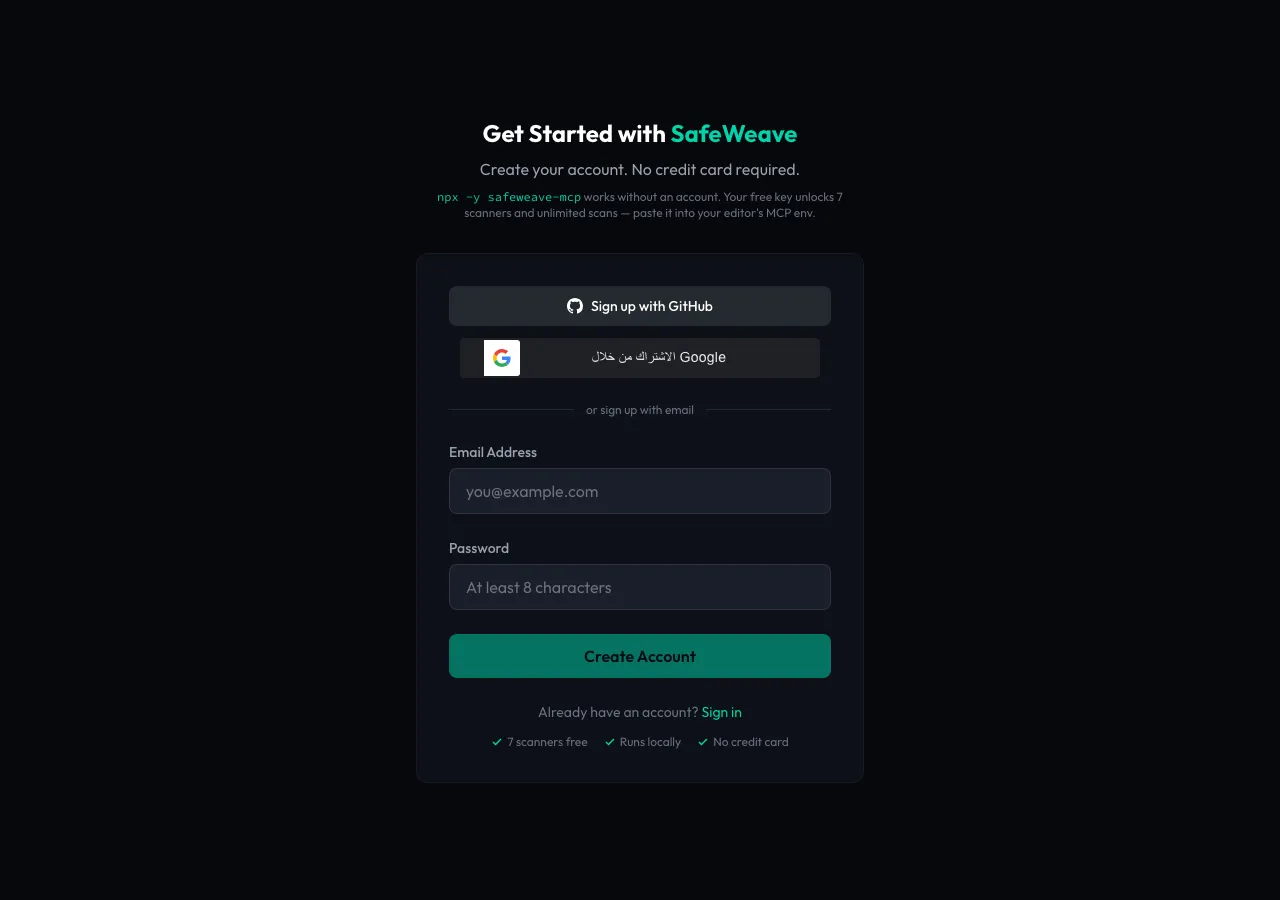
- If you signed up with email, you'll see Check your email. Open the email from SafeWeave, type the 6-digit code into Verification Code and click Verify Email. GitHub and Google sign-ups skip this step.
- You'll see Welcome to SafeWeave with Your License Key. Click the copy icon and save the key somewhere safe, such as your password manager. We also email it to you. You need it to run SafeWeave in your editor.
- Click Sign In to Dashboard and sign in with the same method you used to sign up. You land on the Overview page.
If it doesn't work
- No code arrived. Check your spam folder. The code expires after 15 minutes. Click Try again, then submit the same email and password again: we send a new code.
- "Verification failed". Check the code against the newest email from SafeWeave and type it again.
- GitHub or Google sign-in fails. Try again, or sign up with email instead.
Your Get started checklist
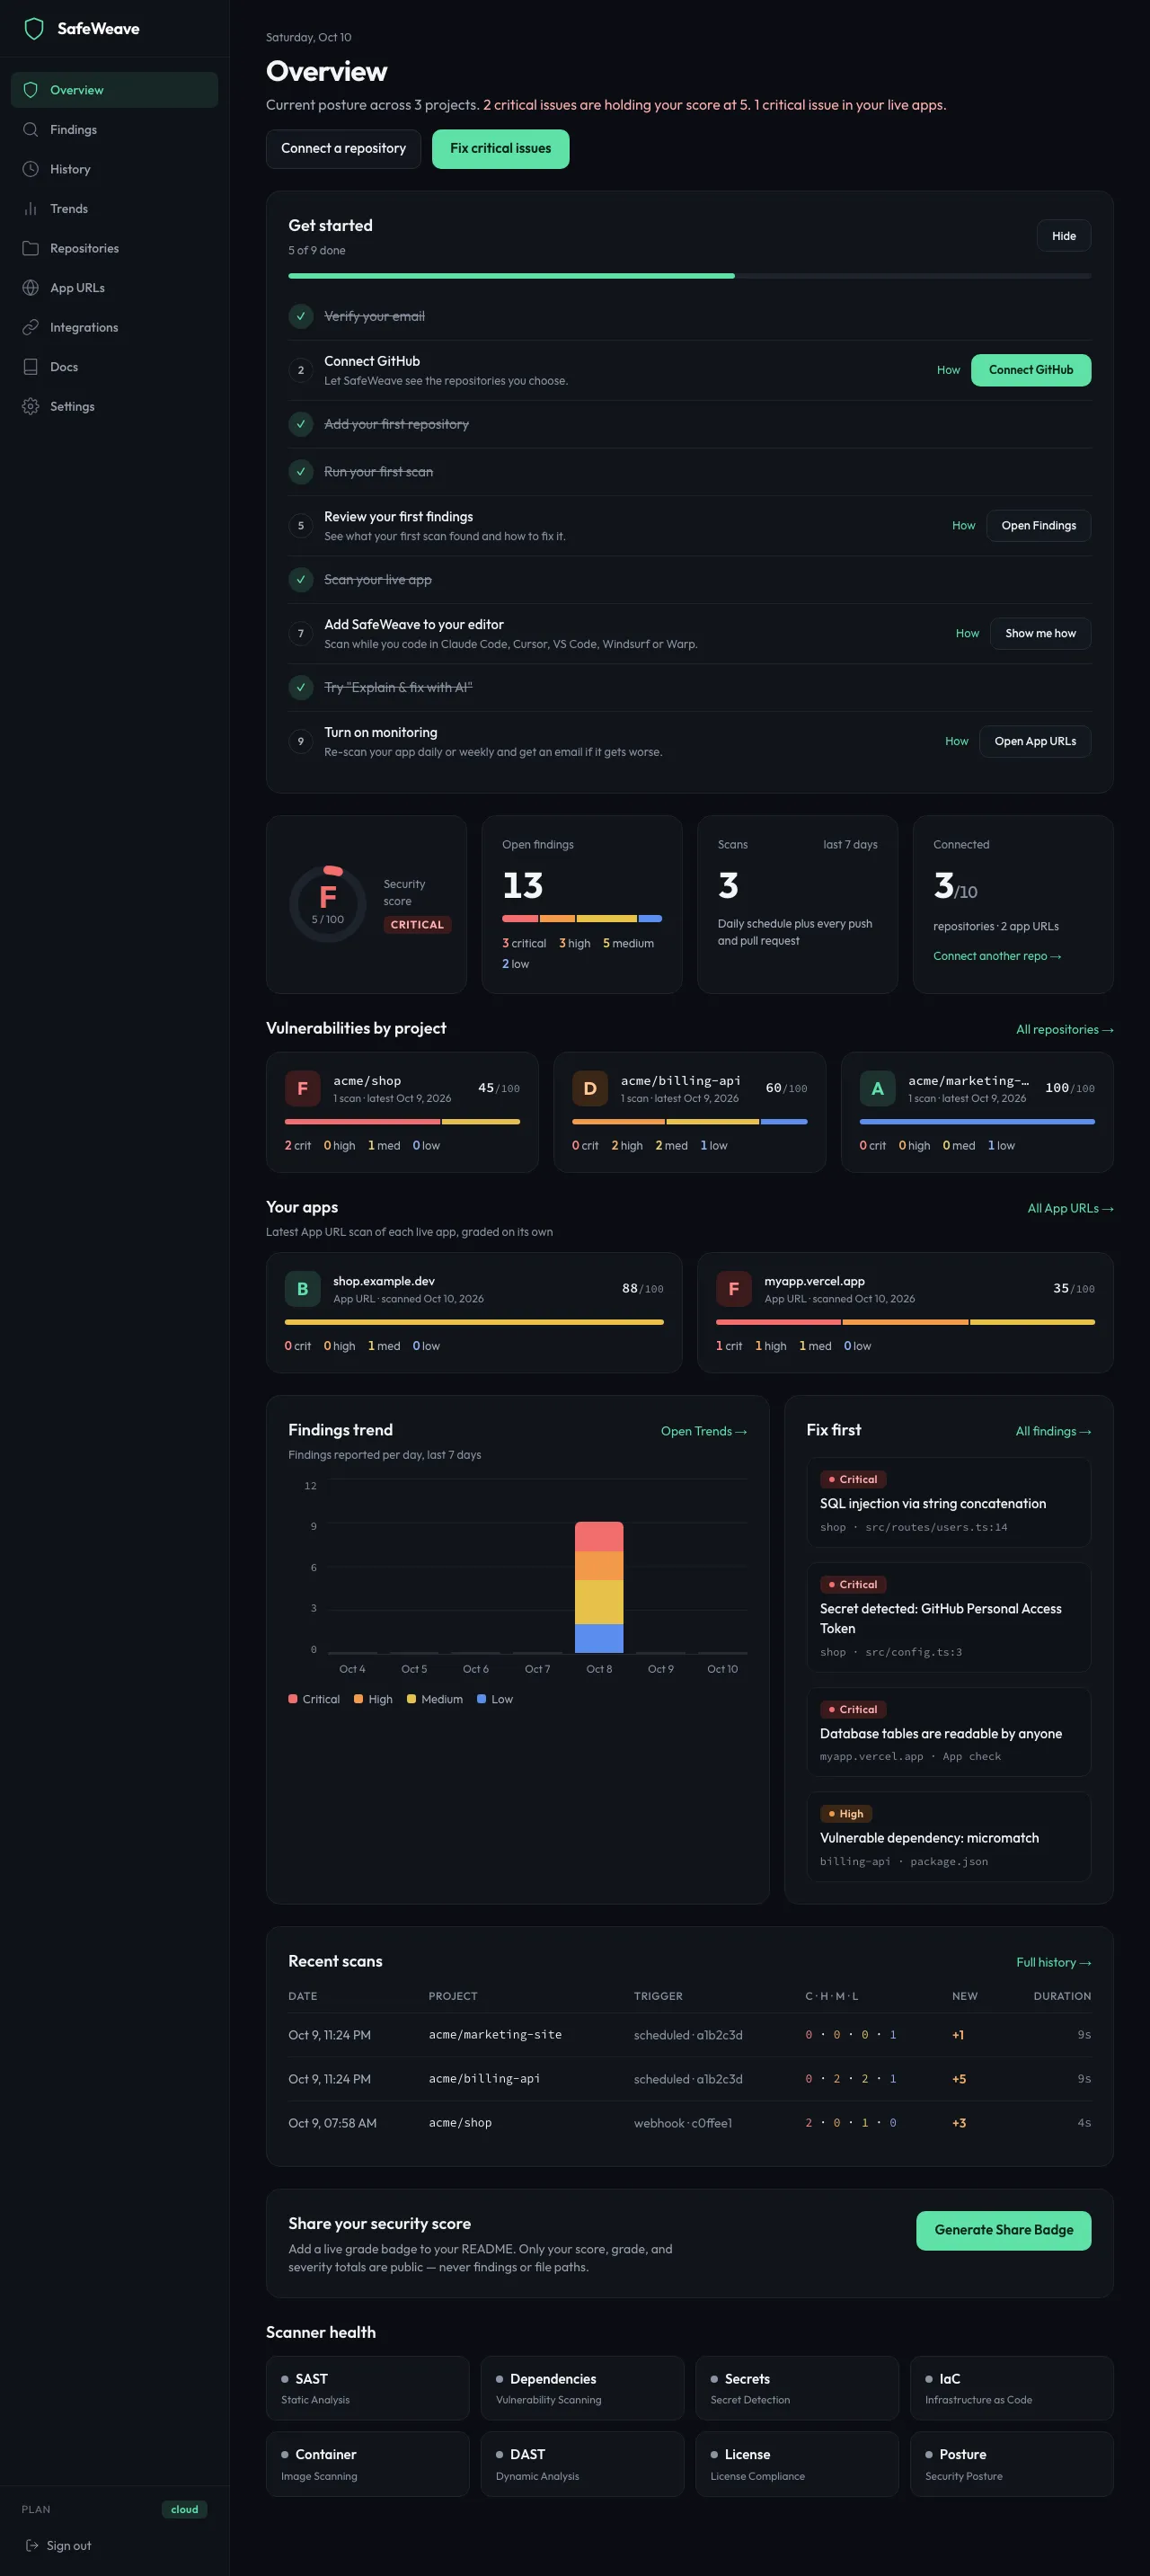
When you first open the dashboard, the Overview page shows a Get started card at the top. It lists the steps below, ticks each one off by itself once you've done it, and shows how many you've finished. Each step has a button that takes you to the right page and a How link to the matching section here.
- Free accounts see the first seven steps.
- Cloud accounts also see Try "Explain & fix with AI" and Turn on monitoring.
- Cloud Plus accounts also see Invite a teammate.
Click Hide to remove the card. It stays hidden on every device you sign in from, and it disappears on its own once every step is done.
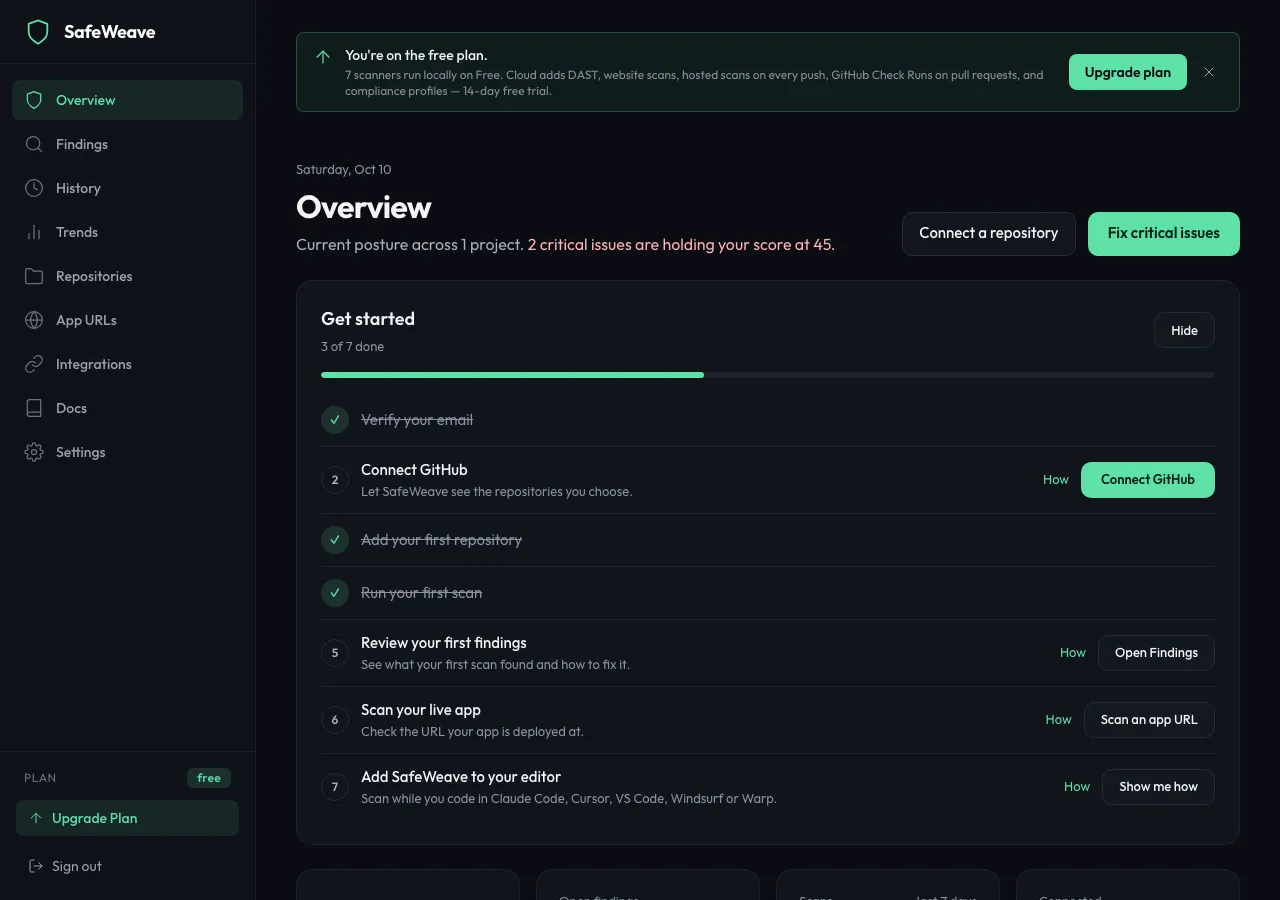
Verify your email
This step is already ticked when you reach the dashboard: signing in needs a verified email, and GitHub and Google sign-ups are verified for you. If you are stuck on the code, see If it doesn't work under Create your account.
Connect GitHub
SafeWeave needs permission to read the repositories you choose.
- In the left sidebar, click Integrations.
- On the GitHub card, click Connect GitHub.
- GitHub opens and asks you to authorize SafeWeave. Click Authorize.
- You come back to Integrations and see "GitHub connected as @your-name. You can now connect repositories." The GitHub card shows Connected.
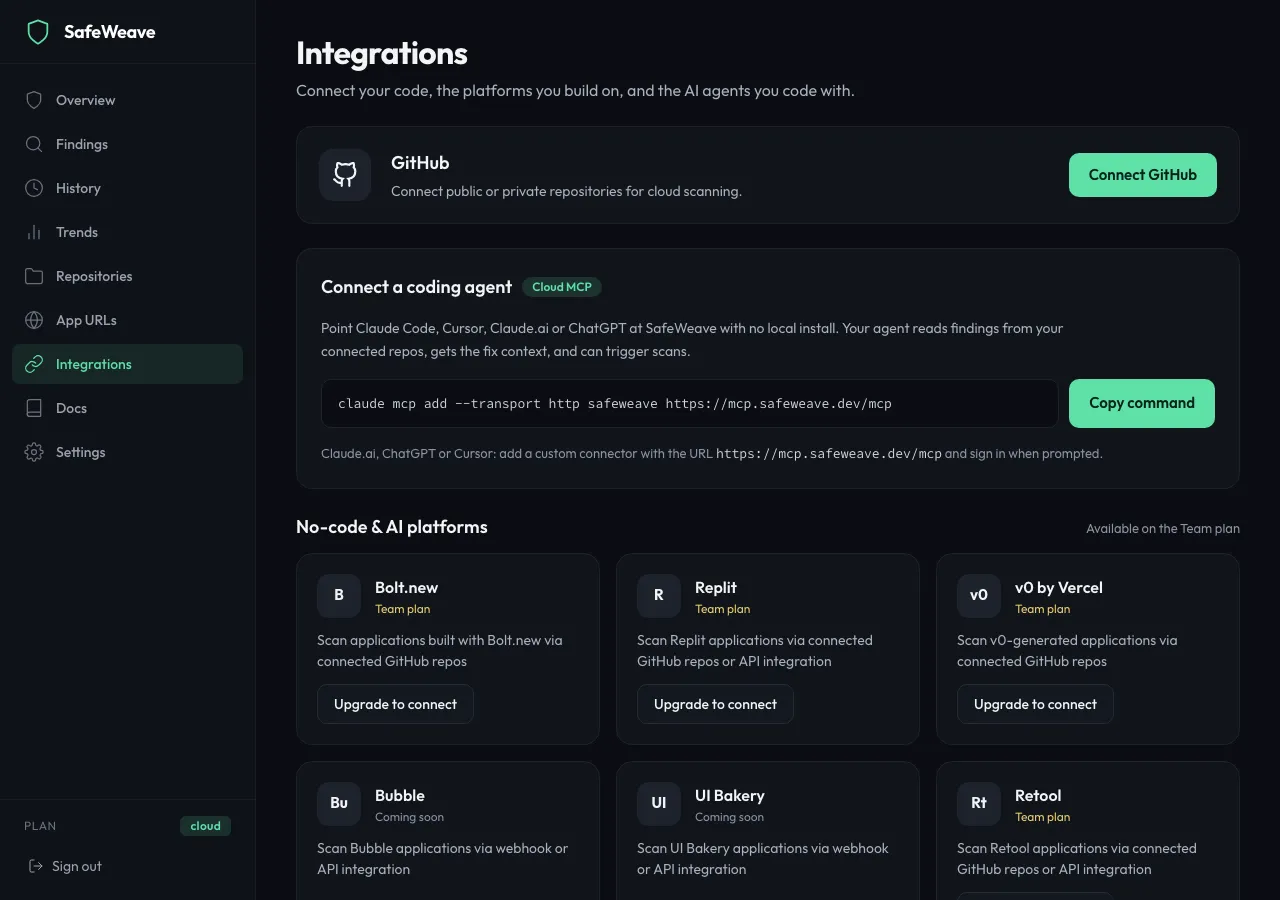
If it doesn't work: if you see "Failed to connect GitHub", click Connect GitHub again. If an organisation's repositories are missing later, ask an owner of that organisation to approve SafeWeave in the organisation's GitHub settings.
Add your first repository
- In the sidebar, click Repositories.
- Click Connect repository (top right).
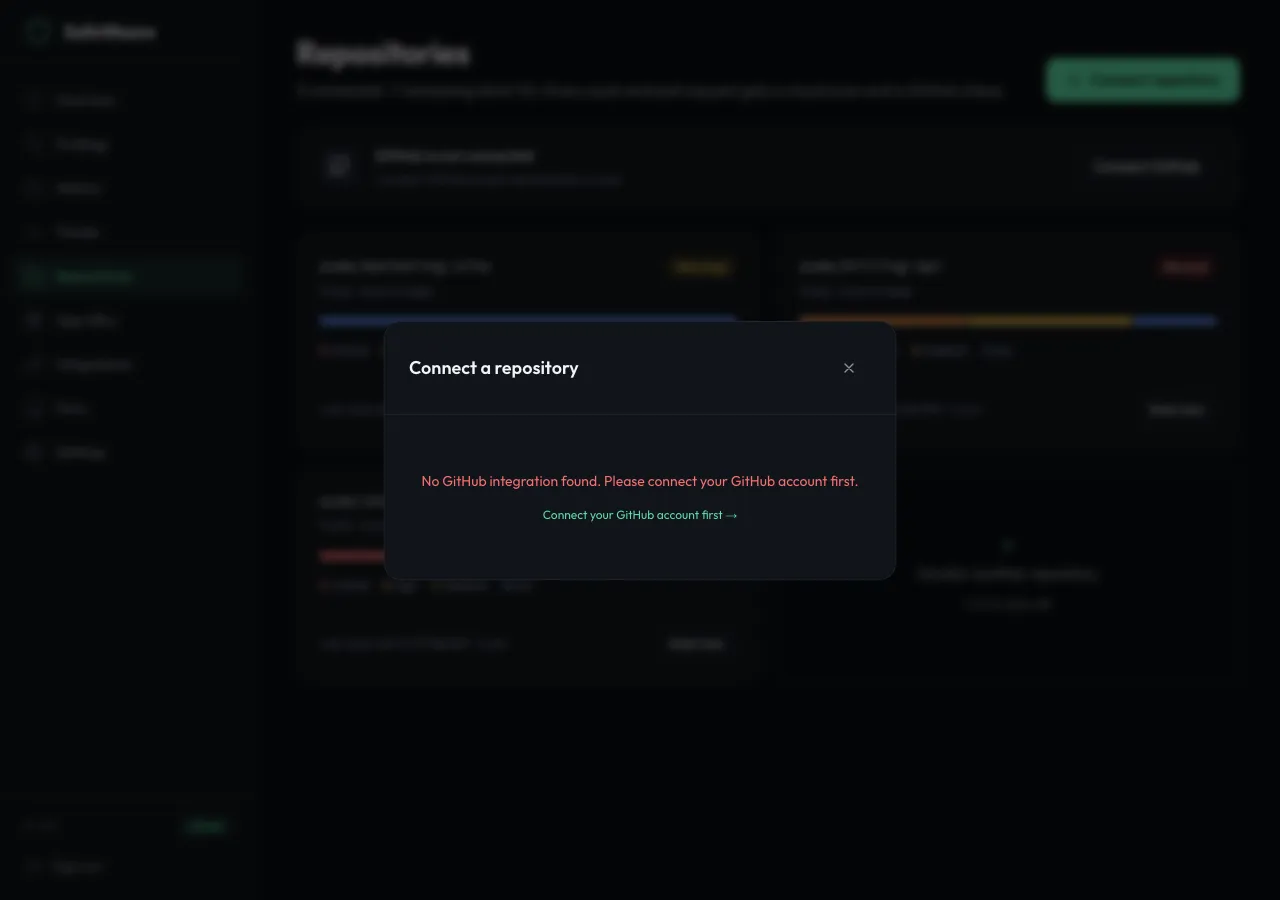
- The Connect a repository window lists the repositories GitHub shares with SafeWeave. Click Connect next to the one you want.
- The repository appears as a card on the Repositories page.
- Free includes one connected repository. Choose your main app. It stays connected for as long as you are on Free.
- Cloud includes 5 repositories and Cloud Plus 15. Click Monitor another repository to add more.
If it doesn't work: "Connect your GitHub account first →" means GitHub isn't connected yet; do Connect GitHub first. If a repository is missing from the list, check that your GitHub account can access it (for organisation repositories, see Connect GitHub).
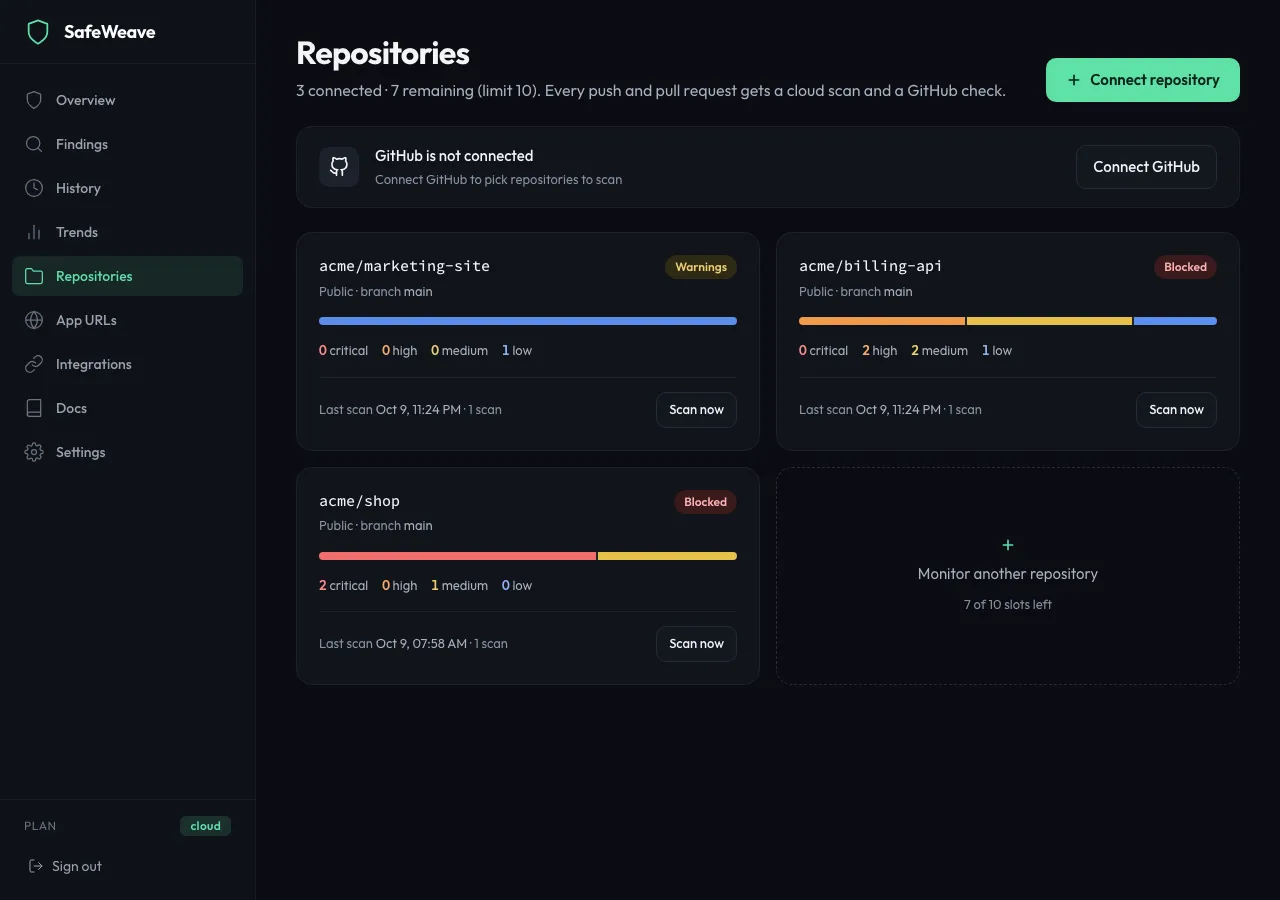
Run your first scan
SafeWeave scans each connected repository on every push and every pull request, and once a day on Cloud and Cloud Plus. On Free and Cloud, pushes, pull requests and Scan now count toward 15 scans per repository a month on Cloud and 5 on Free, and the daily automatic scan never counts; see Choosing a plan. You don't have to wait:
- On the Repositories page, find your repository's card.
- Click Scan now. The button shows Starting…, then Scan queued.
- Most scans finish within a few minutes. When the scan is done, the card shows Passing, Warnings or Blocked, and "Last scan" shows the time.
If it doesn't work: if you see "Could not start a scan", wait a minute and click Scan now again. If a card still says Not scanned after ten minutes, check that GitHub still shows Connected under Integrations, then click Scan now again.
Review your first findings
- Click your repository's card. The repository page shows your Security score and grade, with counts for Critical, High, Open issues and Resolved.
- Below, the Findings tab lists what the scan found, worst first.
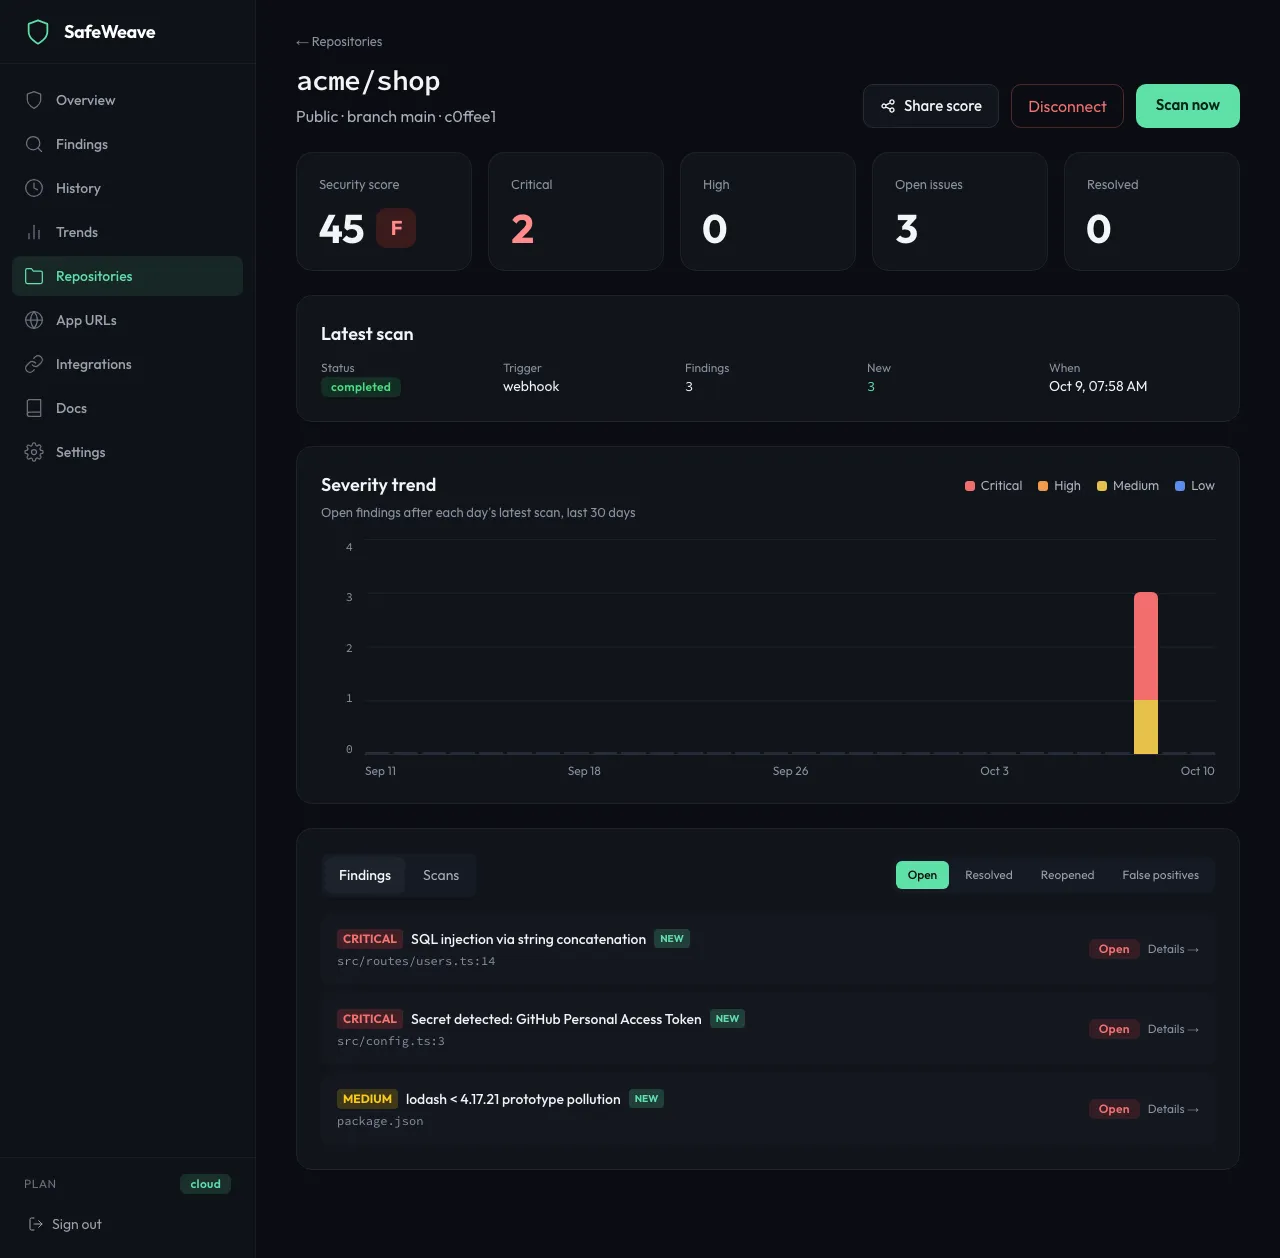
- Free: you see your grade and how many findings there are at each severity. The details and the fix for each finding are part of Cloud. Click Start 14-day free trial to see them. This step is ticked once your first scan finishes.
- Cloud and Cloud Plus: click Details → on any finding. A panel opens with where the problem is, what it means and How to fix. Click Copy fix prompt and paste it into Cursor, Claude Code or any AI assistant that has your repository open. This step is ticked once you've opened a finding.
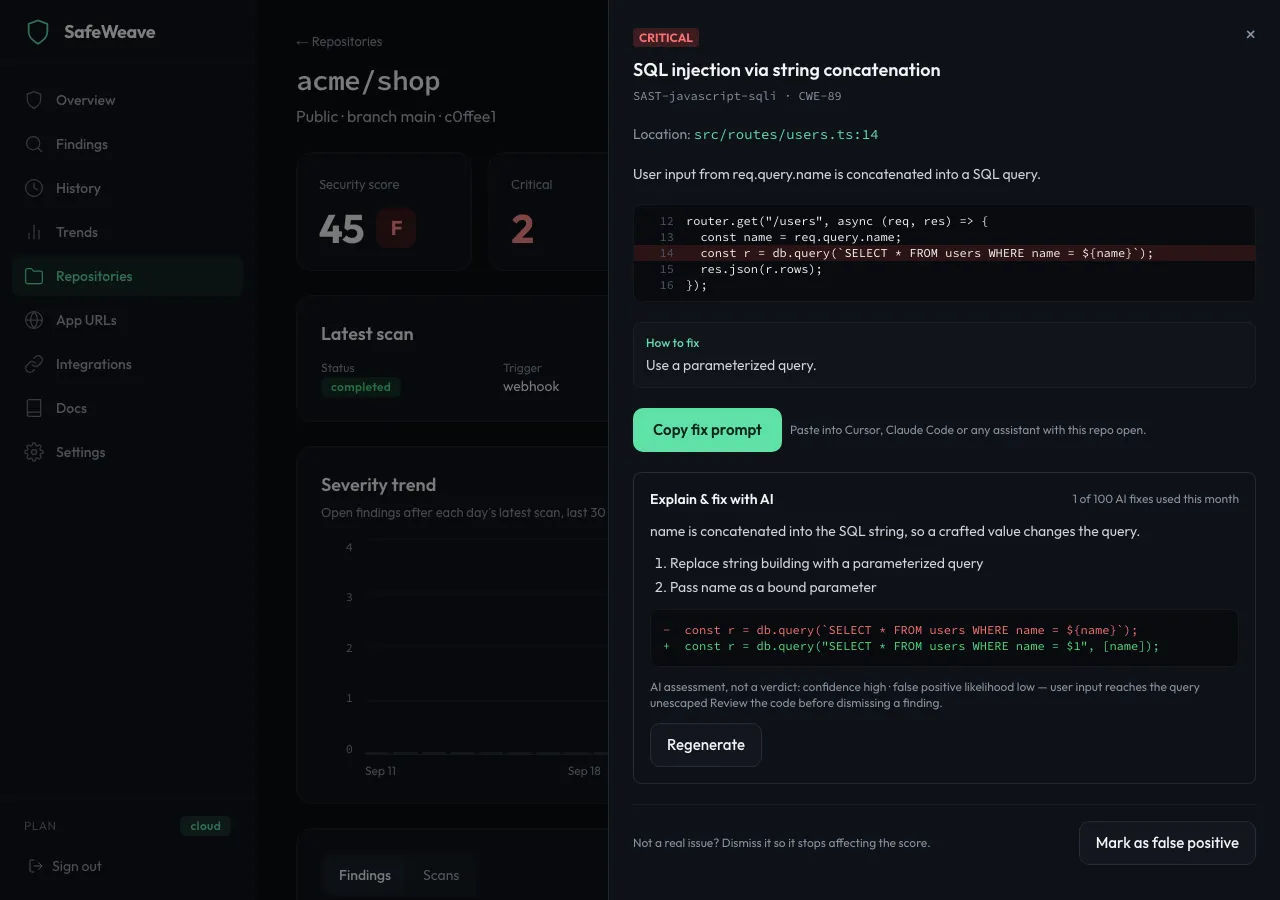
Read Reading your results to understand grades and severities.
Scan your live app
Your code is only half the picture. Check the site your app is deployed at too:
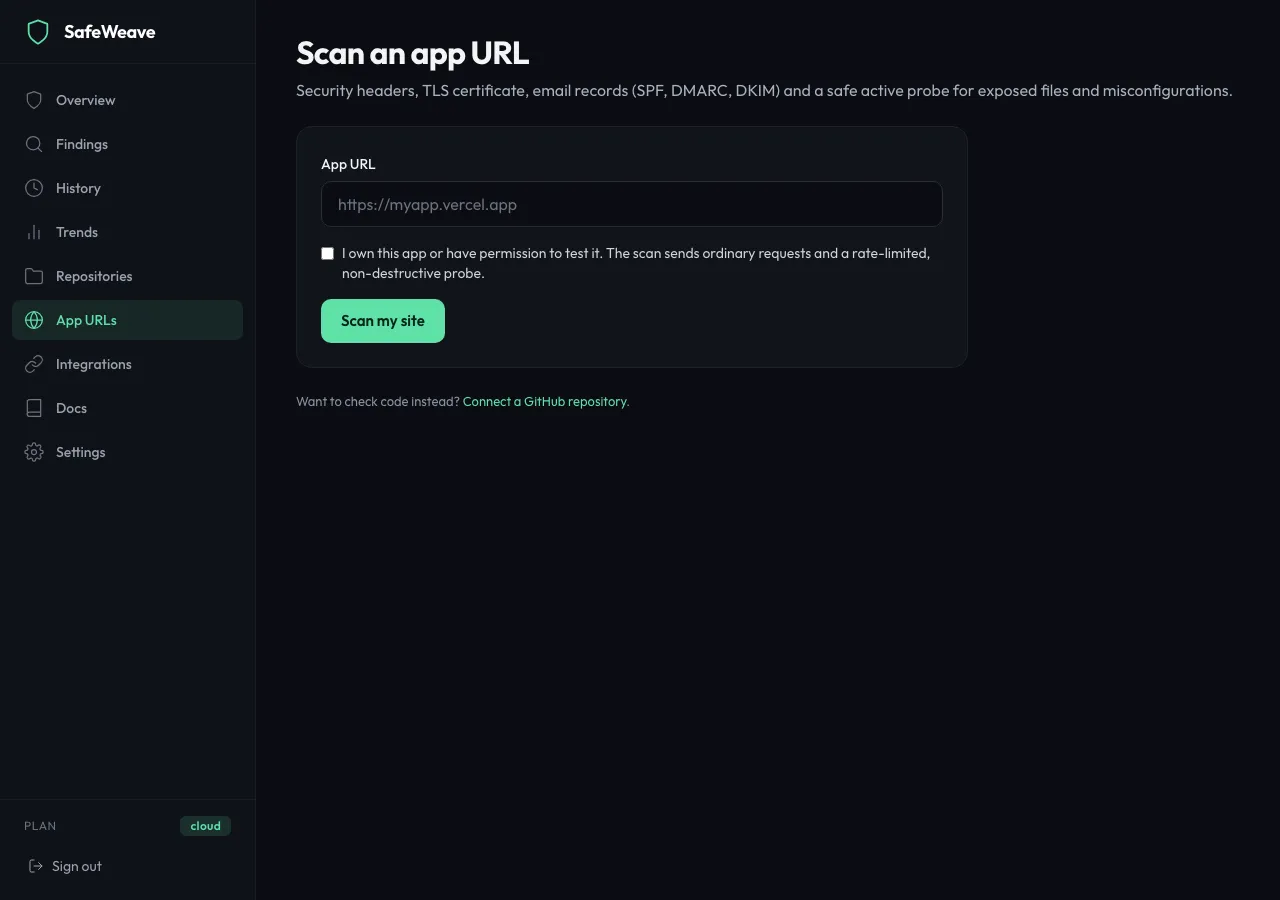
- In the sidebar, click App URLs, then Scan an app URL.
- In App URL, type the address of your deployed app, for example
https://myapp.vercel.app. - Tick I own this app or have permission to test it. Only scan apps you own or are allowed to test.
- Click Scan my site.
- You see Scanning with progress steps. Most scans finish in one to three minutes, and you can leave the page: the result is saved.
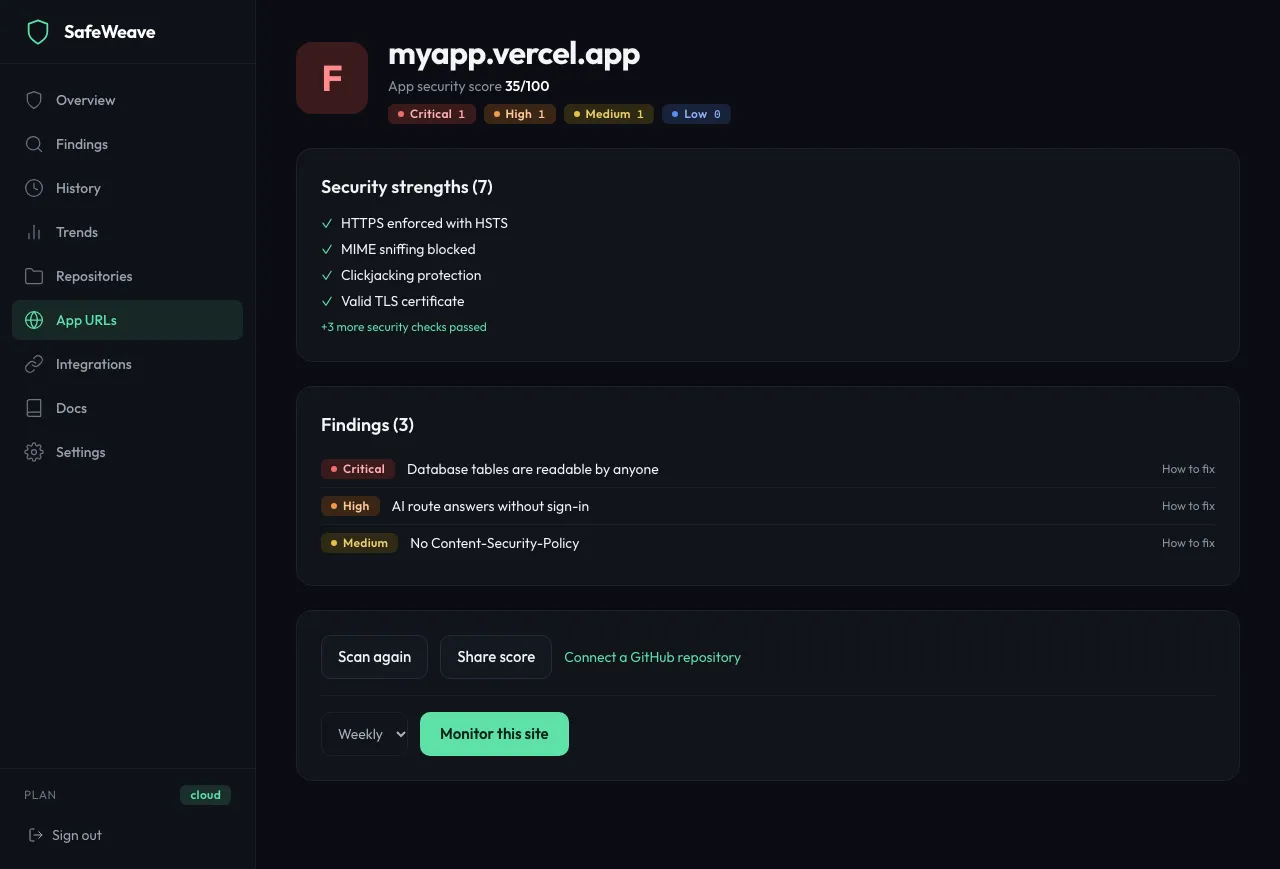
- The result shows your App security score, the Findings and the Security strengths your app already has.
On Free you see your score and the first findings. Cloud shows every finding with its fix and runs extra live checks that look for readable database tables, open storage buckets and exposed keys. See App URLs.
If it doesn't work: "This site was scanned a few minutes ago" means you can scan it again after 10 minutes. If the scan says it did not finish, check that the address opens in your browser, then click Try again.
Add SafeWeave to your editor
Run SafeWeave while you code, and ask your AI assistant to fix what it finds.
- Open your terminal in your project folder.
- For Claude Code, run:
claude mcp add safeweave -e SAFEWEAVE_LICENSE_KEY=your-license-key -- npx -y safeweave-mcp
- Restart your editor and ask: "Scan this project for security vulnerabilities".
For Cursor, VS Code, Windsurf and Warp, follow Add SafeWeave to your editor. This step is ticked after your first scan with your license key from your editor, terminal or CI. Lost your key? Generate a new one in Settings (see Your account).
Try "Explain & fix with AI"
Cloud and Cloud Plus.
- Open any finding: from Findings in the sidebar, or from a repository page.
- In the panel, under Explain & fix with AI, click Explain & fix with AI. It shows Thinking… for a few seconds.
- You get a plain-language explanation, numbered steps and a code change you can apply. The panel also shows how many AI fixes you've used this month.
AI answers can be wrong. Read the suggested change before you apply it. See Fixing issues.
Turn on monitoring
Cloud and Cloud Plus. SafeWeave re-scans your app on a schedule and emails you if its grade drops.
- Open an App URL result (sidebar App URLs, then click a scan under Recent scans).
- In the actions card, choose Weekly or Daily.
- Click Monitor this site. You see "Monitoring weekly" (or daily).
- The app now appears under Monitored apps on the App URLs page, where you can Pause or Remove it.
Invite a teammate
Cloud Plus.
- In the sidebar, click Settings.
- In the Teammates card, type your teammate's email into the box (it shows
teammate@company.com). - Click Invite. You see "Invite sent." and your teammate gets their own license key by email.
Cloud Plus includes up to 5 people, you included. To remove someone, click Remove next to their email: their key stops working immediately. Only the team owner can invite and remove people. See Working as a team.
Free plan path
On Free, do the checklist in order:
- Connect GitHub.
- Add your first repository. Free includes one.
- Run your first scan and read your grade on the repository page.
- Scan your live app.
- Add SafeWeave to your editor with your license key. Scans from your editor show every finding in full, so you and your AI assistant can fix them as you code.
A banner at the top of the dashboard reminds you that you're on Free. Click the × to dismiss it.
Cloud plan path
- Start the trial: click Upgrade Plan in the sidebar (or Upgrade plan in Settings).
- On Upgrade plan, choose Monthly or Yearly and click Start 14-day free trial on the Cloud card.
- Enter your card on the secure checkout page. You won't be charged during the 14 days, and you can cancel any time from Settings.
- You come back to the dashboard on Cloud. The sidebar shows your plan as
cloud. Check your email for your new license key: your old one stops working, so update it in your editor and CI. - Work through the checklist: connect GitHub, add your repositories (up to 5 on Cloud, 15 on Cloud Plus), run a scan, open a finding, copy the fix prompt or try "Explain & fix with AI".
- Open a pull request in a connected repository. A SafeWeave check appears on it, with each problem marked on the line it's on. See GitHub checks.
- Scan your live app and turn on monitoring.
- Optional: connect your AI assistant to your cloud results with Cloud MCP, with no install.
Cloud Plus plan path
- On Upgrade plan, click Upgrade to Cloud Plus and complete checkout. As with Cloud, you get a new license key by email.
- Follow the Cloud plan path. Cloud Plus includes 15 repositories and no monthly scan limit.
- Invite your teammates from Settings. Each person gets their own license key.
Next steps
- Choosing a plan: what each plan includes.
- Your dashboard, page by page.
- Troubleshooting.